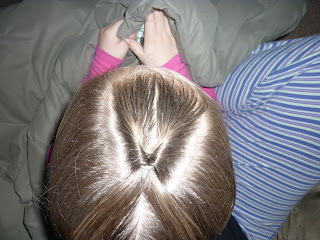
Today's style is what my little one refers to as a flippy. When I was little we had a little tool called a topsy tail. Either way it is simple easy quick style. It is even a dad friendly style. This particular day we did a flippy with two braids at the bottom. They were basic braids started at the base of the scalp. Sorry I do not have pictures yet. We had a rough night with my 2 year old and I wasn't able to post pictures before work. When I get home this evening they will go up. Have a great day.
Friday, February 26, 2010
Wednesday, February 24, 2010
Wednesday Taste Fajitas
Fajitas are a favorite in our house. We use chicken or beef and if we are feeling special we use both. You can use whatever you like best. This is what it looks like when it is all in the pan ready to cook. It is simple and everyone can add whatever they want to it.
INGREDIENTS:
*Chicken or beef
*Red and Green Bell Pepper
*Onion
*Italian Dressing( I use fat Free)
*Worchestire
*All Purpose Seasoning(Tex Joy)
First cut all your veggies. You can make them as big or little as yo want. Then cut your meat. Place everything in a pan together. Once it is all in the pan I pour Italian dressing over the top. Once again there is no exact measurement. It is enough to cover the food and have some on the bottom of the pan. Add Worchestire and Seasoning to your taste. Then turn on the stove and cook. You will have top stir the food throughout the proses. The fajitas are finished when there is no dressing left in the pan and the chicken or beef is cooked. Add to your tortilla and top with whatever you like. Enjoy. This is the finished product.
Monday, February 22, 2010
Make It Monday Headband
I have been looking for a headband everywhere. However I have not been able to find one that is just right. So I decided to make my own. I went to target and bought a pair of infant tights. I then cut the leg out. Once the leg was cut I folded the edge over and hot glued it together. you then will need to take the two ends and glue them to together to form a circle. Make sure to measure it on your child's head before you glue it. This was so simple and inexpensive. I was able to make a white, pink, and an opaque headband. These are now my little ones favorite.
This is the fabric flower that I made to add to the headband. It was fairly simple to make. I loved the way it turned out. I also like that you can decide how big to make the flower. I found the tutorial at http://maizehutton.blogspot.com/2007/08/frayed-flower.html. I hope that you find this tutorial as helpful as I did.
This is the finished product. I love it and so does my little one. She loves that we can take the flower fabric off and add any of her bows to it.
I'm linking up at:
My Frugal Familyhttp://theherberfamily.blogspot.com/2010/01/love-banner.html
This is the fabric flower that I made to add to the headband. It was fairly simple to make. I loved the way it turned out. I also like that you can decide how big to make the flower. I found the tutorial at http://maizehutton.blogspot.com/2007/08/frayed-flower.html. I hope that you find this tutorial as helpful as I did.
This is the finished product. I love it and so does my little one. She loves that we can take the flower fabric off and add any of her bows to it.
I'm linking up at:
My Frugal Familyhttp://theherberfamily.blogspot.com/2010/01/love-banner.html
Saturday, February 20, 2010
Friday, February 19, 2010
Friday Styles
Every Friday I will post a new hairstlyle for little girls. I hae a four year old that is a very big priss. Every morning she will let me know how he wants her hair. I know how difficult it can be to come up with a new idea. Hopefully this will help you get some new ideas.
Wednesday, February 17, 2010
Here is a Quick and simple pork chop recipe. It turns out to be quite tasty.
INGREDIENTS:
Pork Chops
Lemon Juice
Italian Dressing
SEASONING (Tex Joy)
Worchestire
Mix all ingredients in a nonreactive bowl. I did not use any measurements just enough to cover the chops and leave a little on the bottom of the pan. Coat pork chops in the mixture. Place in 425 degree oven and cook for 30 minutes. That is it. The lemon juice gave it a great taste. Enjoy. This is what we paired our meal with.
Monday, February 15, 2010
MAKE IT MONDAY PICTURE PUZZLE CUBE
This week I made a little craft for my husband. He has taken it to his office and it sits on his desk. I am very pleased with the way it turned out.
SUPPLIES
*Triangle puzzle cube ( from the dollar store)
*pictures
*Modge Podge
Start by printing pictures to match the size of the cube. Then cut them to fit. It is that simple. Then Modge podge them on and you are done. You will have 9 different images to look at in different shapes and sizes.
SUPPLIES
*Triangle puzzle cube ( from the dollar store)
*pictures
*Modge Podge
Start by printing pictures to match the size of the cube. Then cut them to fit. It is that simple. Then Modge podge them on and you are done. You will have 9 different images to look at in different shapes and sizes.
Sunday, February 14, 2010
SCHEDULE
I HAVE DECIDED TO ATTEMPT TO MAKE A SCHEDULE. WITH GOING BACK TO WORK I KNOW THAT I WILL NOT BE ABLE TO BLOG OR CRAFT DAILY. I PLAN TO HAVE AT LEAST THREE DAYS A WEEK THAT I POST SOMETHING. THESE WILL BE THE DAYS
MAKE IT MONDAY
WEDNESDAY TASTES
FRIDAY STYLES
ON MONDAY THERE WILL BE SOME TYPE OF PROJECT.
WEDNESDAY WILL HAVE A SIMPLE MEAL IDEA.
FRIDAY WILL BE A LITTLE GIRL HAIRSTYLE.
HOPE YOU ENJOY!
MAKE SURE TO BECOME A FOLLOWER TO LET ME KNOW YOU LIKE WHAT YOU SEE.
MAKE IT MONDAY
WEDNESDAY TASTES
FRIDAY STYLES
ON MONDAY THERE WILL BE SOME TYPE OF PROJECT.
WEDNESDAY WILL HAVE A SIMPLE MEAL IDEA.
FRIDAY WILL BE A LITTLE GIRL HAIRSTYLE.
HOPE YOU ENJOY!
MAKE SURE TO BECOME A FOLLOWER TO LET ME KNOW YOU LIKE WHAT YOU SEE.
Thursday, February 11, 2010
Tuesday, February 9, 2010
BE MINE
Monday, February 8, 2010
VALENTINE SHIRTS
For Valentines Day I wanted to make something special for my daughter and niece. I love the little valentine shirts at the store but wanted something personalized. I decided that I would make my own. I do have a sewing machine, however I am a new to sewing. I wasn't sure if I could handle going around all of the details. My hesitation led me to no sew heat and bond.
SUPPLIES
*White shirt
*No sew heat and bond
*Fabric
*Iron
*Templates ( I made my own)
Trace your design onto the heat and bond. I made mine in a word document and printed them out. You can free hand or find any image you like.
SUPPLIES
*White shirt
*No sew heat and bond
*Fabric
*Iron
*Templates ( I made my own)
Trace your design onto the heat and bond. I made mine in a word document and printed them out. You can free hand or find any image you like.
Place the images on the fabric paper side up and iron them on. Make sure that your fabric is right side up. Trust me because I made this mistake.
Once they are ironed on the fabric cut out your shapes. This is what mine look like all cut out. Now I am ready to iron them on to the shirts. Just peel off the paper and iron on to the shirt.
Here are the finished projects. I am so proud of them. They really are cute.
FABRIC WREATH
This was intended for the front door. However my 4 year old loves it and it now hangs on her door. It was a very inexpensive project and simple to do.
SUPPLIES:
*Styrofoam wreath
*Styrofoam wreath
*Fabric
*Hot glue
*Hot glue
These are what you need to start the project. Cut your strips of fabric as thick or thin as you would like. You could also just use on type of fabric. These were scraps and that is why i used two types.
Start by placing the two pieces of fabric next ot eachother and hot glue them to the wreath form. Then continue to wrap the fabric around the form. I did not cut my original piece of fabric long enough and had to use another set. If this happens just hot glue the start of the fabric down again and continue. Do this till you get to the end of the fabric.
Tie a bow with the excess ribbon at the top of the wreath. I decided to hot glue my fabric so that he bow would stay in the same place.
XOXO LETTERS
I decided that after Christmas was over the house looked so bare. I didn't know what to put up and came up with this little idea while I was at Joannes. Everything was on sale and the cost was under $6. You can't get better than that.
SUPPLIES:
*Wood or paper mache letters to spell out the word
*Paint (Bubblegum pink)
*Scrapbook paper 4 pieces. ( I used 2 different styles)
To start you will need to trace the letters onto the card stock and cut them out. You will need 2 pieces for each letter. That will cover the front and the back. You will also need to paint the sides of the letters that will not be covered with paper. Once this is done and dry modge podge the paper onto the letters. Let dry and you have a great valentines decoration.
Subscribe to:
Posts (Atom)